How to Test Upload to Second Life
Annotation: This test supports the new features of the Project Importer viewer currently (March 2015) available for testing at Linden_Lab_Official:Alternate_Viewers. The old examination can be found at [1].
Purpose
Test all functionality of the Mesh Import window. (Meet Mesh for Mesh feature details)
Test Plan
Uploading Model Bones Functions
- Open the inventory, click the + menu button and Upload > "Model."
- Alternatively, utilize the build carte du jour (Build > Upload > Model)
- Verify a File Dialog Box opens
- On Windows, 3D scene/UI should go along to update while file dialog box is open.
- Pick a .DAE file from your calculator, or try duck.dae from https://jira.secondlife.com/secure/zipper/82907/duck.dae
- Verify the Import Model window appears.
- Verify the Level of Detail tab shows data most each LOD (High, Medium, Low, Lowest) including # of triangles and vertices in each LOD. These are generated automatically.
- The model should be presented in a mini window and "spinnable" using the aforementioned mouse and keyboard commands as "spinning" around objects in-earth.
- Verify Import Model window does non block you from accessing Second Life (conversation, inventory, etc).
- Verify the Abolish button and X close push in upper correct hand corner important Model window closes the window without fault.
Naming a Model
- Enter a name for your model
- Confirm that this field only allows alpha numeric characters
- Confirm name is bars to 64 characters
- Confirm Unicode characters cannot exist entered or appropriate fault is given as inventory items cannot contain Unicode characters. eg. mélange visait à recréer entraîné façon 本項では主にオペラ作品について扱う
- Confirm that the name entered is given to the object uploaded to the Objects folder
- Confirm that leaving the proper name field blank defaults to one of the names in the mesh file be uploaded
Preview Window
- Verify the Loftier LOD is selected by default in the Preview Window
- The model should be presented in a mini window and "spinnable" using the aforementioned mouse and keyboard commands as "spinning" around objects in-world.
- Verify y'all can zoom in/out on the model and rotate it right and left with mouse elevate.
- Verify y'all can rotate the model upward and downwardly with ctrl + mouse drag.
- Verify you can pan the model with ctrl + shift + mouse elevate.
- Verify that selecting the different Levels of Particular from the Preview Drop Down box shows the selected Level of Particular in the preview window (High, Medium, Low, Lowest)
Evidence Edges
- Use duck.dae
- Enable Show Edges and verify that the Preview shows the edges of the triangles.
- Disable Show Edges and verify that the triangles edges are no longer highlighted in the Preview window.
Testify Physics
- Apply duck.dae, click the Physics tab and set "Stride 1: Level of Detail" to Depression.
- Shows selected physics shape if bachelor
Display Textures
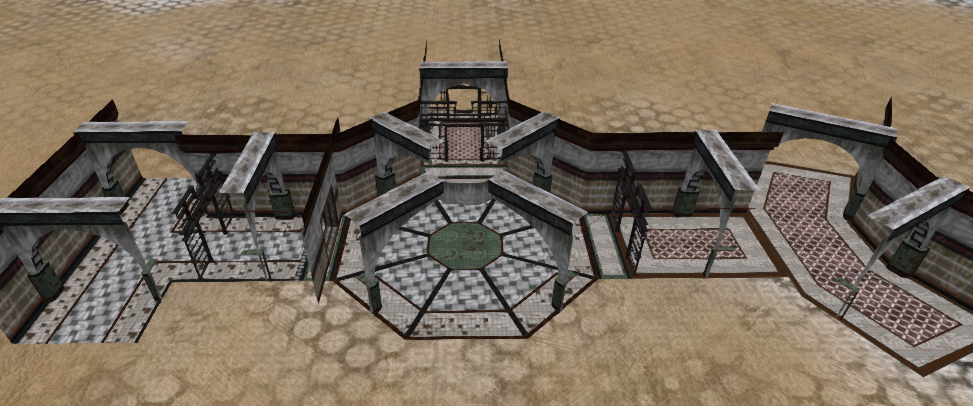
- Download files for TestHall from https://jira.secondlife.com/secure/attachment/84128/TestHall_models_new_2.zip and https://jira.secondlife.com/secure/attachment/82954/TestHall_textures.zip
- Unzip the files into ane folder.
- Upload TestHall_MESH.dae
- Under the Preview window, bank check Brandish... Textures.
- Verify textures are visible in the preview window.
Show Skin Weight
- Download a rigged mesh, https://jira.secondlife.com/secure/zipper/82969/simplebot.dae
- Upload the model in SL
- Verify the model appears in the T pose in the preview window.
- Check Display... Peel weights nether the preview window.
- Verify the model now has the arms at the sides.
Show Joint Positions
- Download a rigged mesh, https://jira.secondlife.com/secure/zipper/82969/simplebot.dae
- Upload the model in SL
- Verify the model appears in the T pose in the preview window.
- Check Display... Skin weights under the preview window.
- Cheque Display... Joints
- Verify the joints are displayed in dark blueish.
Level of Detail Functions
- Examination with duck.dae
Triangle Limit
- Note the # of triangles shown for the High LOD
- Ready the Preview view to Low
- Enter a value for Low Triangle Limit that exceeds the # of triangles for the Medium LOD
- Confirm a message indicating that the Level of detail has also many vertices. (At that place is no other effect besides this message. The object will upload fine.)
- Set the Preview view to Medium
- Fix the Medium Triangle Limit to a lower value and hit enter
- Verify this updates the model in the preview window.
- Verify the model's item has decreased in the preview window
- Confirm you can set a diversity of dissimilar values from the depression to loftier and decimations are generated with no viewer errors
- Annotation: The number of triangles entered in the triangle limit field may not be the # of triangles that end up in the decimated LOD. When you enter a triangle limit here, that is the value that is fed into the decimator with all the other parameters selected, the output # of triangles is the result of that decimation. This will change from model to model.
Error Threshold
- Gear up the Preview view to Medium
- Side by side to Medium LOD, select Error Threshold from the Triangle Limit Dropdown
- Confirm entry in the Error Threshold field is limited to a range from 0.000 to 100.000. (Note: most of the change happens between 0.0 and two.5)
- Confirm that a value of 0.000 for Error Threshold shows the maximum # of triangles where 100 shows the smallest (2 triangles 3 vertices per object)
- Confirm with some values between 0 and 100 for Fault Threshold that the model becomes less detailed with higher values.
Load From File
- Nether the source for the Medium LOD select "Load from file"
- Select browse and verify a file chooser opens
- Choose a different model. (https://jira.secondlife.com/secure/zipper/82973/cube2.dae)
- Set the preview window to Medium
- Verify the model you chose shows upward in the preview window.
Relieve State
- Confirm that changing betwixt LOD states the values for each LOD are preserved and are non overwritten (values entered for Loftier LOD are saved when modifying the Medium LOD etc..)
Generate Normals & Crease Angle
The Crease Bending adjusts the smoothness of the model.
- Click the Generate Normals checkbox.
- Change the Crease Bending to 0 or ane.
- Hit Enter in the text entry box
- Verify most every polygon on the face should be apparent. In this case in that location is no smoothing - the normal of the face up is used at all vertices producing a faceted look with a pucker or hard edge between faces.
- Change the Crease Angle to 180
- Verify that the model now has polish shading, no creases.
- Ostend the bounds for entry are 0.000 to 180.00. Entering a value college or lower will default back to boundary. Ex. inbound 5000 will default to 180.00. Entering -20 will default to 0.000.
- Confirm non-numeric characters cannot exist entered for crease bending.
- Confirm inbound a blank value uses the previous value entered.
- Confirm setting values for this field works for large and small models
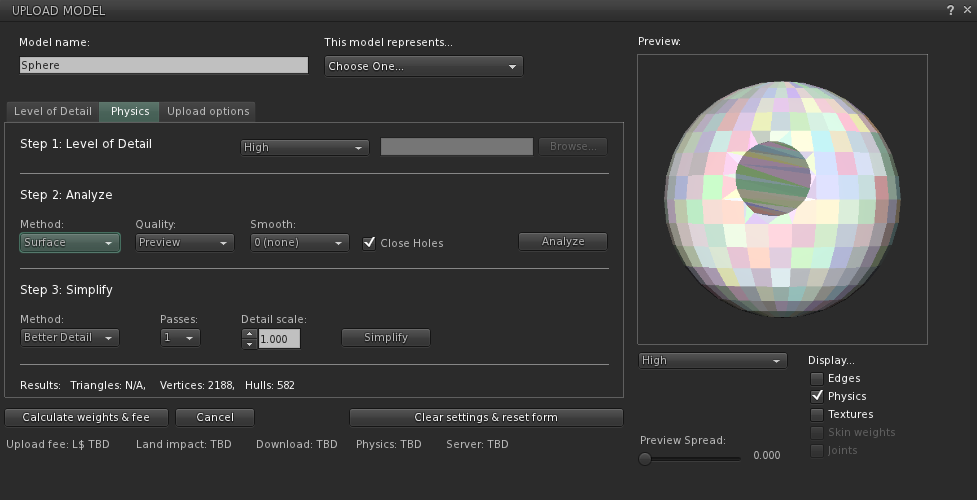
Physics Decomposition
- Select the Physics Tab
- Ostend the Analyze and Simplify steps are disabled by default
Step i - Level of Detail
- Select the Employ Level of Particular Drop Down box and Select Low ( Repeat for each LOD (Lowest, Low, Medium, High) and for Selecting a File for the physics)
- Ostend a physics layer is shown in the Preview Window and the Number of Triangles is shown at the bottom of that panel
- Ostend Pace 2: Analyze section is at present active
Step 2 - Analyze
- Upload a model such equally duck.dae
- Select the Physics tab in the upload model dialog and select Step 1: Level of Detail > Medium
- Ostend that Method: Surface, Quality: Normal, Smoothen: 0.000, and Close Holes: Unchecked are default values
- Click Analyze Button
- Ostend the Analyze button changes to Abolish and remains that mode until Clarify has finished.
- Confirm that a colored pattern is now shown in the Preview Model
- Ostend the # of vertices and hulls is now listed at the bottom of the panel
- Confirm Step 3: Simplify is now agile
Assay Method
- Ostend there are 3 different methods listed in the Method drop down nether analysis: Surface, Solid, and Wrap. In general the surface method works all-time on curved or organic shapes, the solid method works well on buildings with lots of precipitous angles and a clear inside/outside. The wrap method is good for producing a cheap, crude decomposition for things like trees.
- Each analysis method will produce different results depending on the type and content of model and the desired method selected will vary from model to model and user to user depending on the utilise. No single setting will work the best for all models. Duck.dae is a good model to demonstrate how the surface method is preferred for that type of model - generating the best representation. A tree model is good representation of how wrap is the preferred method.
- In general the solid analysis method is a slower process.
- Ostend that selecting the different assay methods allows analysis to be completed on models with multiple meshes and that the decomposition occurs on all meshes in the model. (eg. https://jira.secondlife.com/secure/attachment/82976/double_duck.dae)
- Confirm that selecting the different analysis methods allows analysis to be completed without error on models of varying sizes and complexity. (as time allows)
- Run the following tests on duck.dae to confirm expected results on a specified model
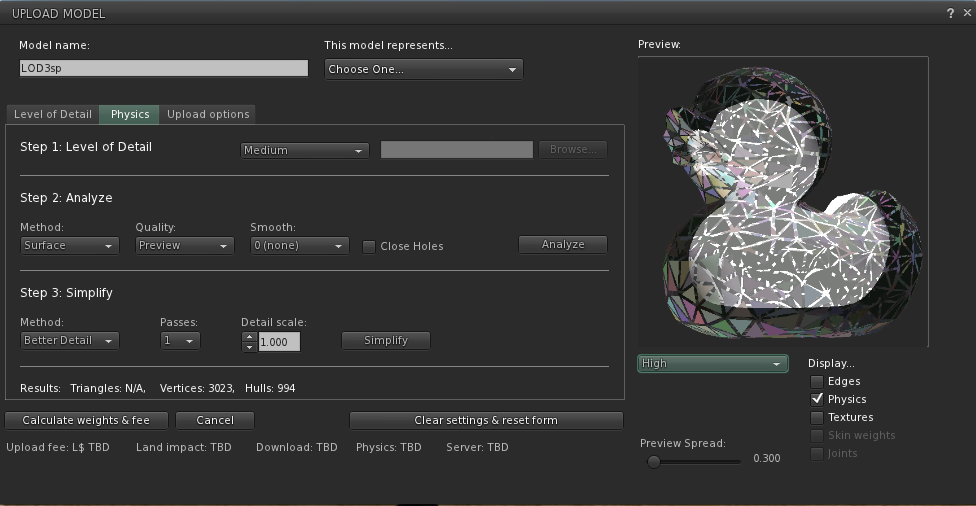
- From the 'Method drib downward carte du jour' select Surface and from the Quality driblet down carte select Preview
- Click Clarify
- Confirm the analysis completes (Analyze button switches to a Cancel button while analysis is ongoing - selecting the abolish push button should end the analysis)
- Surface decomposition starts past treating each triangle equally a second hull and so combining them. Move the Preview Spread slider a bit and then yous tin can meet the decomposition in the preview window. Confirm that yous see a collection of 2D hulls as in screenshot below
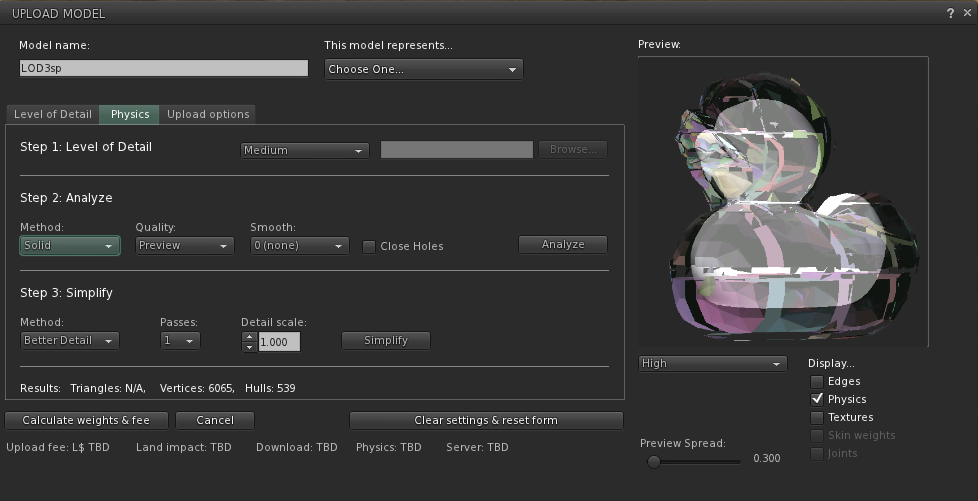
- From the 'Method drop downwardly menu' select Solid and from the Quality drop down menu select Preview
- Click Clarify
- Ostend the analysis completes (Clarify button switches to a Abolish button while analysis is ongoing - selecting the cancel push should cease the analysis)
- Solid decomposition treats the shape as a hull with volume and then combining them. Motion the Preview Spread slider a bit and then you can see the decomposition in the preview window. Confirm run across a collection of 3D hulls with volume as in the screenshot below.
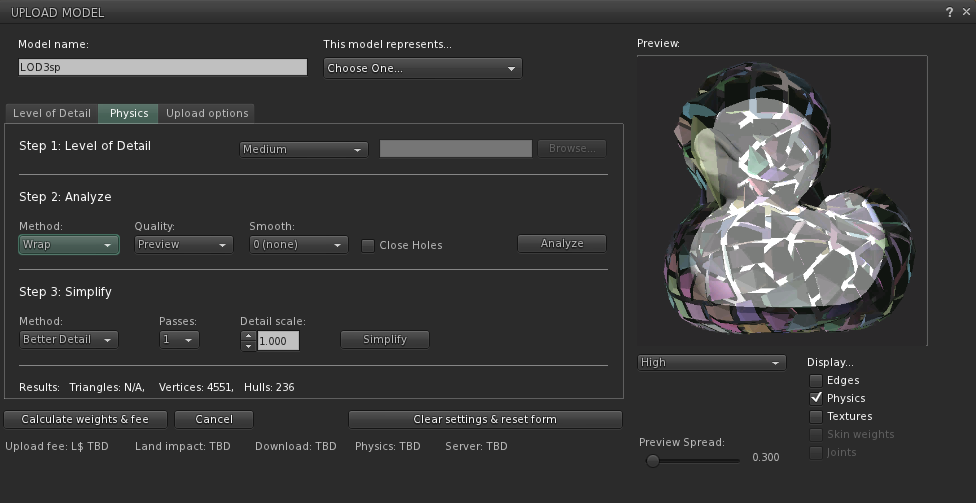
- From the 'Method drop down carte' select Wrap and from the Quality drop downward bill of fare select Preview
- Click Analyze
- Confirm the analysis completes (Clarify push button switches to a Abolish button while analysis is ongoing - selecting the cancel push button should end the assay)
- Wrap decomposition creates one hull for the whole mesh and then splits information technology repeatedly until a max hull count is reached.. Move the Preview Spread slider a flake so you tin see the decomposition in the preview window. Confirm meet a collection of 3D hulls with volume as in the screenshot below.
- Ostend in that location are 3 options in the Quality drop down menu: Preview, Normal, High
- These values relate to how much combining and overlap reduction is performed at the decomposition stage. Preview will do minimal work attempting to merge the initial hulls, loftier volition exercise the most work. A typical workflow would be to do a preview run to ensure you're using a expert decomposition method, smoothing value, and that holes are getting closed. Then fix the quality to High and run over again to get the best output to use in the simplification process.
- Use a model such as duck.dae and run assay with Preview quality selected and annotation the number of Hulls
- Alter the quality to Normal and run assay once more. Confirm the number of hulls is less than the Preview quality
- Alter the quality to High and run assay once again. Confirm the number of hulls is less than Normal quality
Smooth (values from 0 to 10)
- Confirm the immune values for Smooth are 0 to x.
- Smoothen value sets the tolerance when the utility tries to merge coplanar triangles. It refers to the bending betwixt side by side triangles for which merging is permitted. A value of i allows some angle between triangles, resulting in gently curving surfaces being flattened.
- Smooth 0 does no additional smoothing. If smooth 0 is used the first Analysis, the results will await the same as Smooth x.
Close Holes (Slow)
- Close holes attempts to turn an open mesh into a closed one.
- Download model that has holes in it such equally: https://jira.secondlife.com/secure/zipper/82977/wholey%20sphere.dae
- Load the model into the Model import window
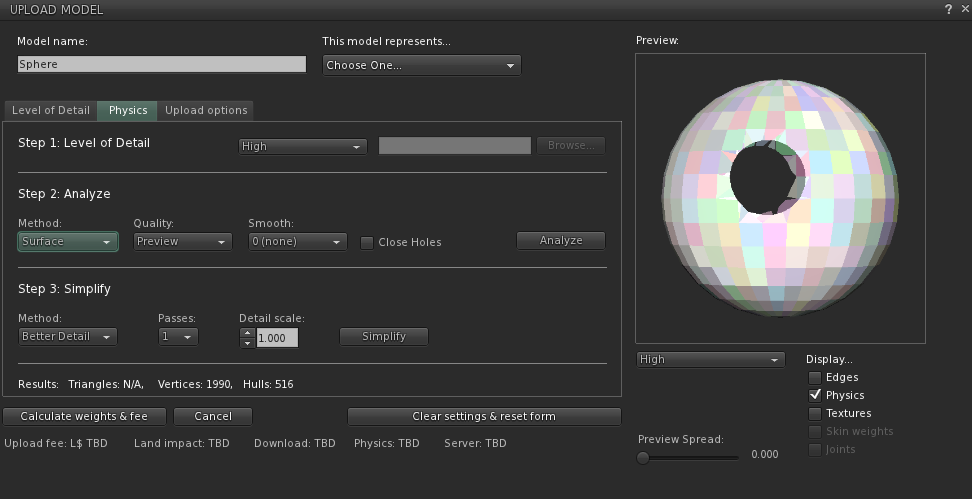
- Conform the view in the preview window then you can come across the holes in the sphere on the far correct
- Select the Physics tab and use the High LOD
- Run an Surface analysis in preview quality with with Close holes unchecked
- Notice you tin can see the holes present (see screenshot beneath):
- Click on Close Holes and run the analysis again
- Ostend you tin can now run across the pigsty has been closed in the physics shape (encounter screenshot below)
- You can also use the Preview Spread slider to expand the hulls to ostend the pigsty is filled.
- Ostend with a variety of models that employ the Close Holes option checked and unchecked does not cause viewer errors and outputs physics shapes.
Step 3 - Simplify
- Select to import a model such equally duck.dae and complete the analysis step as outlined higher up
Method
- Nether Simplify select Retain % from the Method drop downwards card
- Ostend the Range for Retain is 0 to 100 (this is the percentage of hulls to maintain in the physics LOD)
- Select a value of 0 for the Retain % and confirm this simplifies to 1 hull per mesh in the model (for duck.dae that would be i hull)
- Select a value of 100 for the Regain % and confirm this retains all the hulls from the Analysis step
- Select a value of 50 and ostend that this retains nearly 50% of the hulls from the Analysis stride
- Select Particular from the Method drib down
- Confirm the Detail Scale range is from 0.000 to 1.000 (Detail Scale is currently in meters, pregnant that virtually models will have values very near 0 in order to preserve item. Scale may need to be changed to get better representation for models). The duck volition simplify to 1 hull.
- Select Amend Detail from the Method drib down
- Confirm the Detail Calibration range is from 0.000 to one.000 (Detail Scale is currently in meters, meaning that near models will have values very near 0 in guild to preserve particular. Calibration may need to be inverse to become better representation for models). The duck will simplify to one hull.
# of Passes
- Confirm the # of Passes range is 0 to 10 in increments of 1.
- Affects of # of passes may be difficult to see in preview window, but with several models if y'all explode the decomposition you should run into a trend toward fewer overlaps and a cleaner decomposition by increasing the number of passes
Preview Spread
- Afterwards decomposing a model, movement the Preview Spread slider.
- Verify the decomposed pieces of the model move abroad from each other as the Preview Spread slider is moved to the correct.
Upload
- When the model is uploaded rez the mesh inworld. Ostend that by default the Physics shape is gear up to convex hull. Using Develop > Return Metadata > Physics Shape, confirm a single convex hull is shown for the mesh uploaded. Alter the Physics shape to Prim in the Edit Tools and confirm that the Physics shape decomposition created during the mesh import process is shown. Best way to confirm this is to use the option to select a physics shape from a file in the import tool, and employ a mesh object of a completely different shape for the physics shape. This will make this very evident when that shape is being used.
Multiple Decompositions
- Confirm that if assay and simplification is washed on the Low LOD and then changed to the Lowest LOD to clarify and simplify you tin switch between LODs in the physics tab and the decompositions are saved
Multiple Physics Meshes
- Select a Model that has multiple layers/meshes like double_duck.dae
- Open up the Upload Model dialog and select the physics tab
- Select a LOD to use
- Select the Analyze selection and confirm that all meshes are decomposed in the model
- Select the Simplify option and confirm that all meshes are simplified in the model
No Physics Shape Selected
- Confirm that if no physics shape is selected that the physics shape shown in world in a single convex hull
Select Physics Shape with No Decomposition
- Ostend that if you select to use a Level of Particular but upload the model without performing analysis or simplification that once uploaded the sim volition use the physics shape mesh for collisions, but if you make the object concrete, a unmarried convex hull will exist used for the physics shape.
Select Physics Shape with no Simplification
- Confirm that if y'all select to use a Level of Particular and Select the Clarify function merely practise not Simplify e'er results in a physics shape that is more expensive than the base mesh. (ie. duck.dae, Step 1: Level of Particular = Lowest, Stride two: Analyze = Surface, High, Max and then clicking Calculate weights & fees is going to generate more hulls and thus be more expensive that if you proceed to the adjacent step and Simplify)
Upload options
- Confirm that options for Scale and including Textures, Skin Weight, and Joint Positions are bachelor
Calibration
- Confirm scaling model up or downward works as expected changing costs and using scale inworld once imported
Textures
- Download files for TestHall from https://jira.secondlife.com/secure/attachment/84128/TestHall_models_new_2.zip and https://jira.secondlife.com/secure/attachment/82954/TestHall_textures.zip
- Unzip the files into i folder.
- Select Build > Upload > Model
- Select the TestHall_MESH.dae file to import
- Select the Upload options tab and check the box to include textures
- In the Preview window cheque the option to show textures
- Confirm textures are displayed on the object
- Import the model
- Rez the object inworld
- Confirm the expected textures are visible to you and other users inworld.
Pare Weight
- Ostend this option is only enabled when bachelor
Articulation Positions
- Confirm this choice is only enabled when available
Calculate weights & fee
- Verify the Import window lists the Upload fee and Country impact.
Upload push
- Click the Upload button.
- Verify at least one mesh shape and ane object is uploaded to your inventory.
- Verify the object has the description you entered earlier.
Upload a rigged object
- Download https://jira.secondlife.com/secure/zipper/82969/simplebot.dae
- Select the model for upload
- Click the Upload options tab in the Upload Model window.
- Cheque Include pare weight and Include joint positions
- Upload the mesh.
- Wear the mesh.
- Hide your avatar model by wearing Inventory Library/Trunk Parts/Alpha Masks/Invisible Avatar
- Verify the mesh is the size of your Avatar.
- Verify the mesh animates when y'all walk around.
Upload a bad object
- Test uploading a bad object (https://jira.secondlife.com/secure/attachment/82972/Messerschmitt%20KR200.dae)
- Verify an fault is returned and the file does not upload.
Models with more than 8 unique faces tin can exist imported
- Download files for TestHall from https://jira.secondlife.com/secure/attachment/84128/TestHall_models_new_2.goose egg and https://jira.secondlife.com/secure/zipper/82954/TestHall_textures.zilch
- Unzip the files into one folder.
- In the viewer choose Build > Upload > Model...
- Select the TestHall_MESH.dae file
- In the Medium Level of Detail, switch Generate to Load from File.
- Click Browse… and select the TestHall_LOD2.dae file
- Click the Physics tab
- In Step 1: Level of Detail, select From file in the menu
- Click Browse… and select the TestHall_PHYS.dae file
- Click the Upload options tab
- Check the Include textures checkbox.
- Click the Summate weights & fee push button
- Click the Upload button
- Rez the object.
- Verify the textures match the following screenshot.
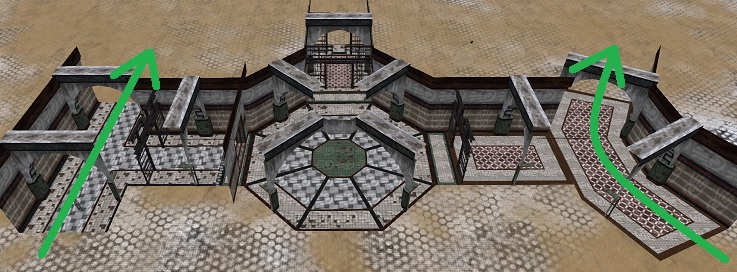
- Edit the object, click the Features tab of the edit tool and change Physics Shape Type to Prim. This will let you lot to walk through some parts of the model if you lot scale it up.
- Scale up the model as much as possible.
- Verify you can walk through the wings shown in the following screenshot.
Name based matching
The viewer uses Proper noun Based Matching to match objects from different LODs in the imported model files. The viewer looks for objects in your Mesh files catastrophe with _LOD2, _LOD1, _LOD0, or _PHYS, and tries to match those object to Medium LOD, Low LOD, Lowest LOD and Physics respectively. If an object doesn't end in one of those, information technology will be considered for the High LOD. If the viewer cannot friction match the LODs this way it volition resort to the old method of matching which is to rely on the order of the objects in the Mesh files.
Exam for the negative instance:
- Begin uploading a model using the TestHall_MESH_misnamed_Atrium1x.dae mesh as the Loftier LOD
- Use TestHall_LOD2.dae for the Medium LOD
- Verify a bulletin appears in the Upload Model window, Error: Material of model is not a subset of reference model.
- Verify the Calculate weights & fee button is disabled.
ImporterDebug
- An ImporterDebug choice has been added to the settings.xml file which, if enabled, causes more information to be output during import
- Open Advanced > Bear witness Debug Settings
- Verify the default setting for ImporterDebug is False
- Set ImporterDebug to TRUE
- Shut Debug Settings.
- Upload the duck.dae model to your inventory.
- Open the SecondLife.log file and verify there are several lines that showtime with "INFO: LLModelPreview::updateStatusMessages:"
- Cleanup: Modify ImporterDebug dorsum to Simulated
Source: https://wiki.secondlife.com/wiki/Mesh_Import_test
0 Response to "How to Test Upload to Second Life"
Postar um comentário